The Timing Light Box or “Box” is approximately 17″ High x 6″ Wide x 7″ Deep. The Box is constructed so that Keyless Lamp Holders (or Light Sockets) can be mounted inside to hold the Red, Yellow, and Green lights. The Box also contains all electronics hardware needed to make the Timing Light work, and on the outside are controls for operation of the Timing Light.
The following are instructions for purchasing and cutting the boards into the pieces that will be assembled into the Box. As of now, you will have to purchase, cut, and drill all the pieces yourself. In the future, pre-cut and drilled pieces may be available for purchase through this web-site.
Start by purchasing the following boards from your local lumber yard or home improvement store. I purchased these boards from Lowes.
- Red Oak 1/4″ x 5-1/2″ x 4 ft
- Red Oak 1/4″ x 3-1/2″ x 3 ft (Qty 2)
- Pine Craft Board 3/8″ x 1-1/2″ x 2 ft
- Pine Craft Board 1/2″ x 1-1/2″ x 2 ft
- Poplar 1/2″ x 1/2″ x 3 ft Square Dowels (Qty 4)
The Red Oak will be on the outside of the box, and will have the nicest finish. The pieces made from the Pine Craft Board and Poplar Square Dowels will be on the inside of the box, and since they will not be seen, it doesn’t matter if they are a different type of wood. You don’t necessarily have to use Red Oak, Pine and Poplar. The box can be constructed out of any type of wood.
Tools Required
- Tape Measure
- Miter Saw
- Jig Saw or Router with 1/8″ Straight Bit
- Drill Press
- 4-1/2 inch Hole Saw
- Drill Bits: 5/8″, 1/2″, 5/16″, 1/4″, 3/16″, 1/8″
- Drill
- 1/4″ Countersink
Step 1: Cut the Boards for Outside of Box
Use the Tape Measure and Miter Saw to measure and cut the outside boards as follows:
- Cut the 1/4″ x 3-1/2″ boards into 4 boards of lengths 17″ each to make the “A” pieces.
- Cut the 1/4″ x 5-1/2″ x 4 ft board into the following lengths:
- 16-1/2″ = Piece “B”
- 17″ = Piece “C”
- 6-3/4″ (Qty 2) = Pieces “D”

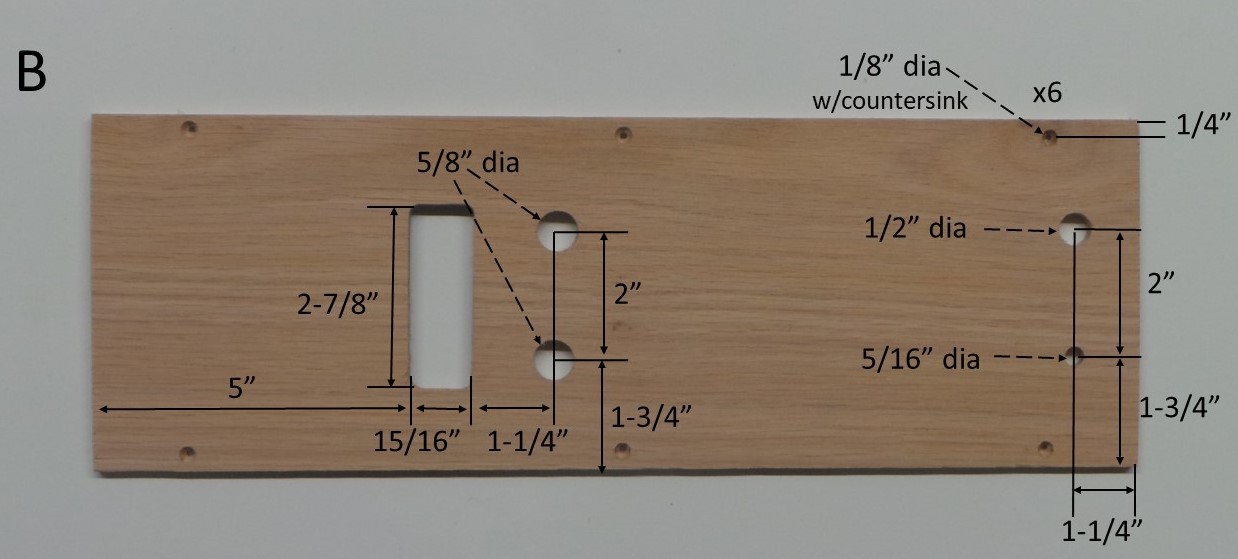
Step 2 – Back Board
Drill or Cut holes in “B” as described and pictured below. This is the back of the Timing Light Box.
- 15/16″ x 2-7/8″ Rectangular Hole for the LCD. This can be cut with either a Jig Saw or a Router with a straight bit. I prefer to use a Router. Edge of LCD hole should be approximately 5 inches from top of board.
- 5/8″ Diameter holes for Push button and Rotary Encoder, approximately 1-1/4″ below LCD hole.
- 1/2″ Diameter hole for On/Off Switch, approximately 1-1/4″ above the bottom of the board.
- 5/16″ Diameter hole for Power Cord, even with the On/Off Switch hole.
- Six (6) 1/8″ Diameters hole for #4 screws to fasten the back to the rest of the box. Holes should be 1/4″ from the side edges of the board. On each side, drill holes 1-1/2″ from top, 1-1/2″ from bottom, and in the middle. Use a countersink so that the heads of the screws will be flush with the surface.
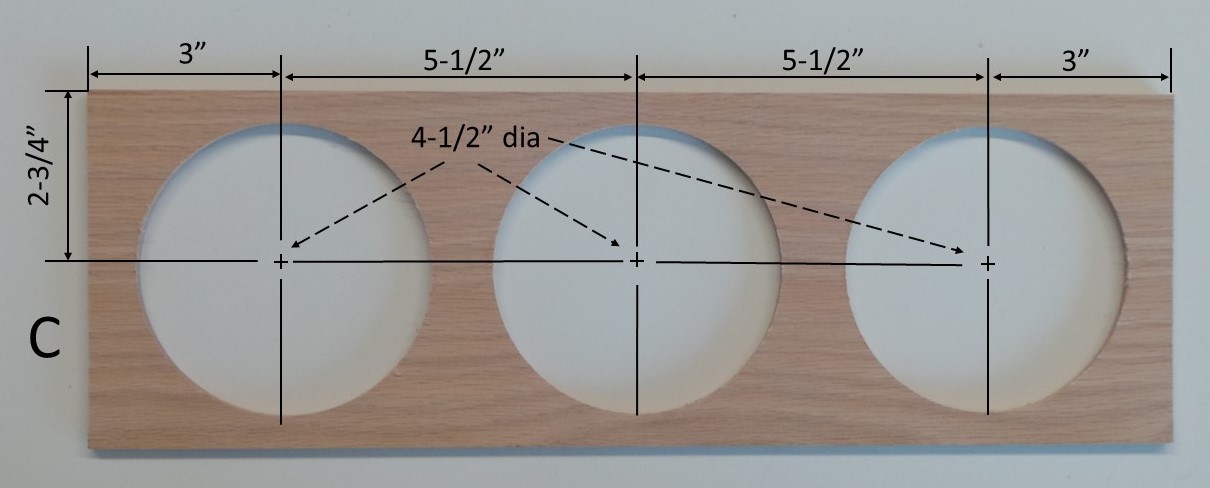
Step 3: Front Board
Use a 4-1/2″ Hole Saw to cut 3 holes in “C” as shown below. Holes should be centered on the short side of the board, and 5-1/2″ from each other on the long side of the board. This is the Front of the Timing Light Box.
Step 4: Lamp Holder Supports
Cut the 3/8″ x 1-1/2″ board into 2 pieces each 12″ long. Drill 3/16″ holes 1″ from the long edge, and 1/2″, 6″, and 11-1/2″ from an end, as pictured below. This is piece “E”. When glued to the inside of the box, this piece will support the Lamp Holders.

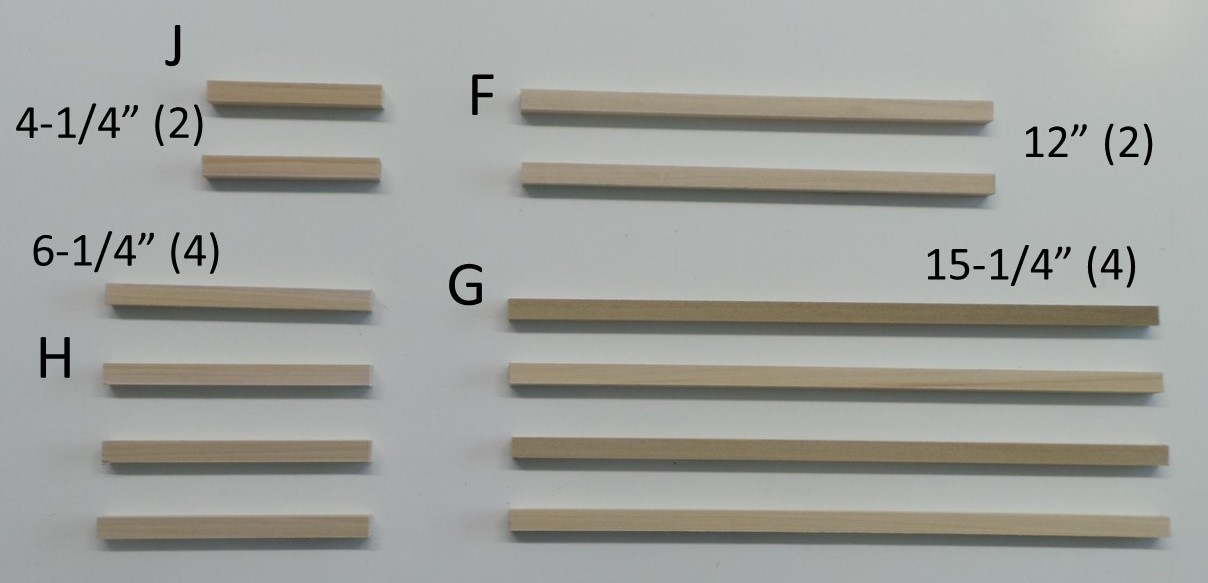
Step 5: Square Dowels
Cut the 1/2″ Square Dowels into the following lengths:
- 12″ (Qty 2) = Piece “F”
- 15-1/4″ (Qty 4) = Piece “G”
- 6-1/4″ (Qty 4) = Piece “H”
- 4-1/4″ (Qty 2) = Piece “J”
Step 6: Rotary Encoder Mount
Cut a 1-1/2″ Square piece from the 1/2″ x 1-1/2″ board. Drill a 1/4″ hole in the middle. This will be used to mount the KY-040 Rotary Encoder. This is piece “K”.

Important – The combined thickness of the Rotary Encoder Mount “K” and the back outside board “B” needs to be 3/4″. (In this example, “B” is 1/4″ thick and “K” is 1/2″ thick.) This will give an appropriate clearance for the Scrubber Knob – enough space so that the Rotary Encoder Switch can be pressed, but not so much space that the Scrubber Knob will stick out awkwardly.
Next: Box Assembly
